
Golf Cart Solenoid Diode and Resistor: What They Do and Which Way the Diode Goes
The resistor across the big solenoid posts keeps the controller's capacitors charged so the contacts don't arc. The diode across the small posts eats the coil's off-spike, and its band must go to coil positive. Here's how to wire, size and test both, and whether a solenoid that has them fits a cart that didn't.
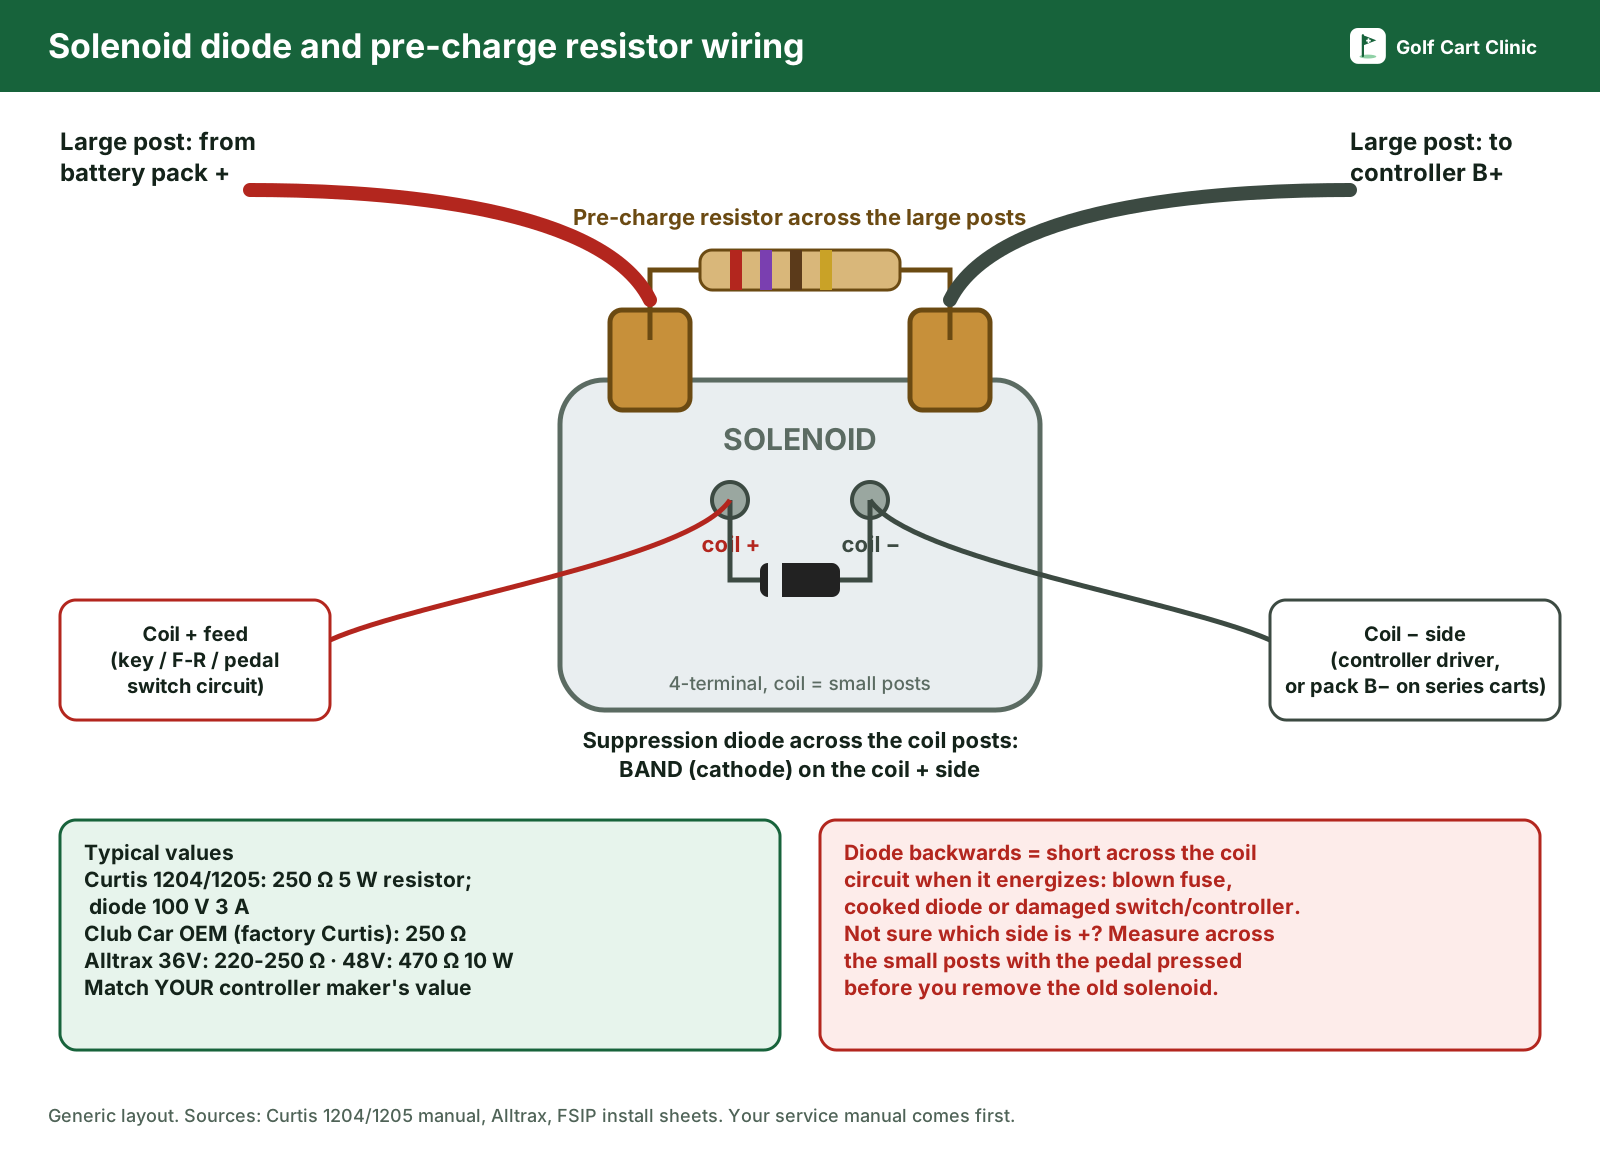
Quick answer: the small resistor across the two big solenoid posts is a pre-charge resistor. It keeps the controller's capacitors charged so the contacts don't arc or weld when the solenoid closes. The diode across the two small posts is a coil suppression diode. It soaks up the voltage spike the coil throws when it switches off. The diode only works one way round: the banded end goes to the positive side of the coil. Get it backwards and it's a short across the coil circuit the moment the solenoid is told to close. A replacement solenoid that comes with a diode and resistor is normally fine to use, even if the old one didn't have them, as long as the coil voltage matches and the band goes to positive.
Safety first. Put the cart in Tow/Maintenance (if it has the switch), turn the key off and disconnect the main battery negative before you unbolt anything on the solenoid. The large posts carry full pack current. Never bridge them with a tool or a jumper to "test" the cart: it can lurch, arc hard or damage the controller. Lift the drive wheels off the ground for any live test where the solenoid will click.
What the diode and resistor actually do
A golf cart solenoid is just a heavy-duty relay. A small coil (fed through the key, the direction switch and the pedal switch, or switched by the controller) pulls in a plunger that connects the two large posts and sends pack power to the controller. The two extra parts protect that setup.
| Part | Where it's wired | What it does | What happens without it |
|---|---|---|---|
| Pre-charge resistor | Across the two large posts | Trickles current into the controller's filter capacitors, so there's no inrush surge when the contacts close | Arcing and pitting on the contacts every time the solenoid closes. Curtis says it's mandatory with cheap "can" solenoids to stop contact welding. Some factory controllers also check for it before they'll run |
| Coil suppression diode | Across the two small (coil) posts | Absorbs the voltage spike from the coil's collapsing magnetic field when it switches off | That spike (Alltrax puts it in the hundreds of volts) hits whatever switches the coil: the pedal microswitch, key switch or the controller's coil driver. Alltrax also says it can cause false speed-sensor signals |
Curtis's own 1204/1205 controller manual calls for both: a 250 ohm, 5 watt pre-charge resistor across the main contactor's contacts, and a coil suppression diode rated 100 V, 3 A on the contactor coil. Alltrax tells anyone fitting one of its controllers to add both to any cart, and says the diode goes on other relays too, like light and accessory relays.
Which way does the diode go?
The diode has a painted band (often white or silver) at one end. That band is the cathode, and it goes to the positive side of the coil. The plain end goes to the negative side. Every source we checked agrees on this: Alltrax's operator manual says the cathode or banded end faces the positive terminal, and its diode kits come with red heat shrink on the positive lead and black on the negative.
The catch is figuring out which small post is "positive" on your cart. It depends on how the coil is switched:
- Controller-switched carts (for example E-Z-GO PDS, DCS and TXT 48): the coil gets battery positive through the key and switch circuit, and the controller completes the circuit by switching the negative side. FSIP's install sheets for the Curtis controllers E-Z-GO used say the non-banded side of the diode goes on the blue wire from the controller (pin J1-6 on PDS 1206MX, pin 7 on DCS 1206SX, pin 12 on TXT 48 1206HB). So the band goes on the other small post.
- Series carts where the coil goes straight to pack negative (for example the series TXT with a Curtis 1206-03/-04): FSIP says the non-banded side goes on the black wires from B- and the backup beeper. Again, the band goes on the other post, the one fed from the key and pedal circuit.
- Not sure? Measure before you take the old solenoid off (see below). Don't guess from wire color alone, especially on a cart someone else has already rewired.
How to find the coil's positive side with a meter
- Lift the drive wheels off the ground and block the front wheels. Leave the old solenoid wired as it is.
- Set the meter to DC volts. Put the probes on the two small posts: red on one, black on the other.
- Run/Tow on Run, key on, direction selected, then press the pedal until the solenoid clicks (or tries to).
- If the meter shows a positive reading close to pack voltage, the post under the red probe is the positive side. If it shows a minus sign, it's the other one. Mark the positive wire with tape.
- Key off, disconnect the main battery negative, then swap the solenoid. The band goes on the wire you marked.
This works even if the old coil is dead, because the circuit still puts voltage across the two wires when it calls for the solenoid.
Old solenoid had no diode or resistor. Can I use one that does?
Usually yes, and on a lot of carts it's what the factory part now looks like anyway. Club Car's older bare 48V solenoid, part 101883601 (the White Rodgers 586-style can), shows as replaced by 101908701. That newer part (written 1019087-01, Curtis SW80) is sold for 2000-and-up DS and Precedent electric carts with the bracket, resistor and diode already attached. Revolution Golf Cars lists the OEM 101908701 as the direct replacement for all 48V DS carts and all Precedents with the factory controller, plus DC-drive Tempo and Onward (not the AC-drive models).
So if your old solenoid was bare and the replacement has both parts, here's what to check:
- Coil voltage matches your pack (36V or 48V, or a 36/48V coil), and the contacts are rated for your controller's current.
- The diode band goes to the positive coil wire. Reversed is the one way this swap goes wrong.
- Only one pre-charge resistor. If the cart already has a resistor on the old solenoid's posts or somewhere else in the harness, you don't need two. Use the value your controller maker lists.
The opposite swap needs more care. If the old solenoid had a diode or resistor and the new one is bare, move the old parts over if they test good, or buy new ones. On controller-switched carts a missing resistor can stop the cart from running at all (see symptoms below).
What size resistor?
There's no universal value. Match the controller.
| Setup | Pre-charge resistor | Source |
|---|---|---|
| Curtis 1204/1205 controllers | 250 ohm, 5 W | Curtis 1204/1205 manual |
| Club Car with factory Curtis controller (48V) | 250 ohm (OEM 1014947) | Revolution Golf Cars OEM listing |
| Alltrax controllers, 24V | 220 ohm, 5-10 W | Alltrax components page |
| Alltrax controllers, 36V | 220-250 ohm, 10 W | Alltrax components page |
| Alltrax controllers, 48V | 470 ohm, 10 W | Alltrax components page |
| Alltrax controllers, 60-72V | 1,000 ohm, 10 W | Alltrax components page |
| Alltrax XCT and NCT | None needed (pre-charges through the tow/run circuit) | Alltrax components page |
How to test the diode and the resistor
Do this with the solenoid disconnected (or at least one lead of the part lifted), or the coil and the rest of the circuit will skew the readings.
- Resistor: set the meter to ohms and measure across the resistor. It should read close to its rated value. Open (OL) or zero means replace it. A cracked, burned or blackened body means replace it too.
- Diode: set the meter to diode test. Red on the plain end, black on the band: you should see a forward reading (typically somewhere around 0.5 to 0.7 on a meter's diode scale). Reverse the probes: it should read open. Low or zero both ways means it's shorted. Open both ways means it's blown. FSIP's series-TXT sheet says to check the diode with a meter before you install it.
- The solenoid itself: with everything disconnected, the coil should measure roughly 100 to 250 ohms depending on type (FSIP). Jumper pack voltage to the coil and the large posts should drop from open to under 0.3 ohm. Our solenoid clicking but won't move guide walks through the voltage test with the solenoid in the cart.
Symptoms of a bad, missing or backwards diode or resistor
| Symptom | Likely cause | What to check |
|---|---|---|
| Fuse blows, a wire smokes or the controller faults the instant you press the pedal after a solenoid swap | Diode on backwards (short across the coil circuit) or a shorted diode | Band direction; diode test both ways |
| E-Z-GO DCS: no walk-away braking, or the cart only drives after about a 10-second delay | Failed diode/resistor module at the solenoid | FSIP's tip for the 1206SX: replace the module |
| E-Z-GO PDS won't run; the controller's J1 pin 5 isn't within 4 V of pack voltage | Pre-charge resistor missing or open | FSIP's 1206MX sheet: confirm the resistor is there and measures right |
| Big snap at the solenoid every time it closes; contacts pitted or stuck closed | No pre-charge resistor, or it's open | Resistor value; replace a welded solenoid |
| Voltage on the solenoid's output post with the key off | Normal with a pre-charge resistor in place | Nothing, as long as the output hits full pack voltage when it clicks |
| Pedal microswitch or key switch keeps failing; erratic speed readings on an aftermarket controller | No suppression diode on the coil (or on an added relay) | Add a diode, band to positive |
That steady voltage on the output post also explains the small spark you get when you land the last battery cable with the key off: the capacitors are charging through the resistor. It's covered in detail in golf cart sparks when connecting the battery.
Upgrading the controller or solenoid?
If you're putting in an aftermarket controller or a heavy-duty solenoid, plan on fitting a new diode and the resistor value that controller's maker lists. Alltrax says its controllers need the solenoid checked or replaced, a heavy-duty F&R switch, and the right diode and resistor on every cart. It sells a 1 A diode kit for 200 A solenoids and a 3 A kit for 400 A solenoids. Some heavy-duty solenoids and kits ship with their own diode and resistor; use those rather than reusing tired parts from the old one.
Still not moving after the swap? Work through golf cart won't move, or, on an E-Z-GO, EZGO TXT won't move, which has the controller pin tests for each drive system, or, on a Club Car, Club Car DS won't move. If you're not sure what year or model you have, try the serial number lookup.
Frequently asked questions
Do I need a diode on my golf cart solenoid?
Controller makers say yes. Curtis and Alltrax both call for a suppression diode on the solenoid coil to absorb the spike when it switches off. A cart may run without one, but whatever switches the coil takes the hit, and on controller-switched carts that's the controller's coil driver.
Which side of the diode goes to positive?
The banded end (the cathode) goes to the positive side of the coil. On E-Z-GO carts with Curtis controllers, FSIP says the non-banded end goes on the blue wire from the controller, so the band goes on the other small post.
What happens if the diode is backwards?
When the coil is energized, a reversed diode conducts straight across it, which is a short on the coil circuit. Expect a blown fuse, a cooked diode, or damage to the switch or controller output that feeds the coil. Turn it around and test it before you try again.
Can I run a golf cart solenoid without the resistor?
Some older carts will, but the contacts take an inrush hit every time the solenoid closes. Curtis calls the resistor mandatory with inexpensive can-type solenoids to prevent welded contacts, and some factory controllers (for example E-Z-GO PDS) look for it before they'll run.
Why does my solenoid's output post show voltage with the key off?
That's the pre-charge resistor doing its job. It feeds a small current past the open contacts to keep the controller's capacitors charged. What matters is that the output reaches full pack voltage when the solenoid clicks.
Sources
- Curtis Instruments, 1204/1205 motor controller manual (main contactor, coil suppression diode MP-1 rated 100 V/3 A, 250 ohm 5 W pre-charge resistor, resistor mandatory with can-type solenoids): curtisinstruments.com (PDF)
- Alltrax, EV systems components (diode and pre-charge resistor purpose, band to positive, resistor values by voltage, XCT/NCT exception): alltraxinc.com
- Alltrax, AXE operator's manual, sections 3.1 "Contactor Coil Diode" and 3.2 "Pre-charge Resistor": alltraxinc.com (PDF)
- FSIP (Flight Systems Industrial Products), install and troubleshooting sheets for E-Z-GO controllers (diode orientation per controller, coil and contact readings, DCS module tip, PDS pre-charge check): TXT 48, Curtis 1206HB, PDS, Curtis 1206MX, DCS, Curtis 1206SX, series TXT, Curtis 1206-03/-04
- Revolution Golf Cars, OEM Club Car 48V solenoid 101908701 (fitment) and pre-charge resistor 1014947 (250 ohm): solenoid, resistor
- U-Source parts listing, Club Car 101883601 "replaced by" 101908701: usource.parts
- Prime Golf Parts, Curtis SW80 solenoid (OEM 1019087-01) with bracket, resistor and diode, DS 2000-up and Precedent: primegolfparts.com
- Your cart's own owner's and service manual. Where it differs from this guide, follow it.
Last checked against the documents above on October 24, 2026. Club Car, E-Z-GO, Curtis and Alltrax are trademarks of their owners; Golf Cart Clinic is independent and not affiliated with any of them.
Questions and comments
No comments yet. Corrections and notes from your own repair are welcome.