
Golf Cart Lights, Horn and Accessories Stopped Working After New Batteries
If the cart drives but the lights, horn, signals and backup alarm died after a battery swap, the 12V accessory feed got left off. Here's how to find the lead, meter the right post, check the fuse or reducer, and avoid burning out your bulbs.
Quick answer: if the cart drives fine but the lights, horn, turn signals, brake lights or backup alarm all died right after a battery swap, the 12V accessory feed is almost certainly disconnected. On many 48V carts that feed isn't on the big pack cables. It's a separate small wire on one battery (or two), or the input of a 48V-to-12V reducer, and it gets left off when the old batteries come out. Find that lead, meter the post before you connect it, check its inline fuse, and the accessories come back.
Safety first. A 48V pack can push hundreds of amps into a short, enough to melt a wrench or a ring. Take off rings and watches, wear safety glasses and use insulated tools. Put the cart in Tow/Maintenance (if it has the switch), key off, charger unplugged, before you touch the batteries. Never lay a tool across the battery tops. Meter every accessory connection before you switch the lights on: a lead on the wrong post feeds 24V or 48V into 12V bulbs and the horn and burns them out instantly. If a wire is melted or a battery case is hot or swollen, stop and call a qualified tech.
Why the lights and horn die after a battery swap
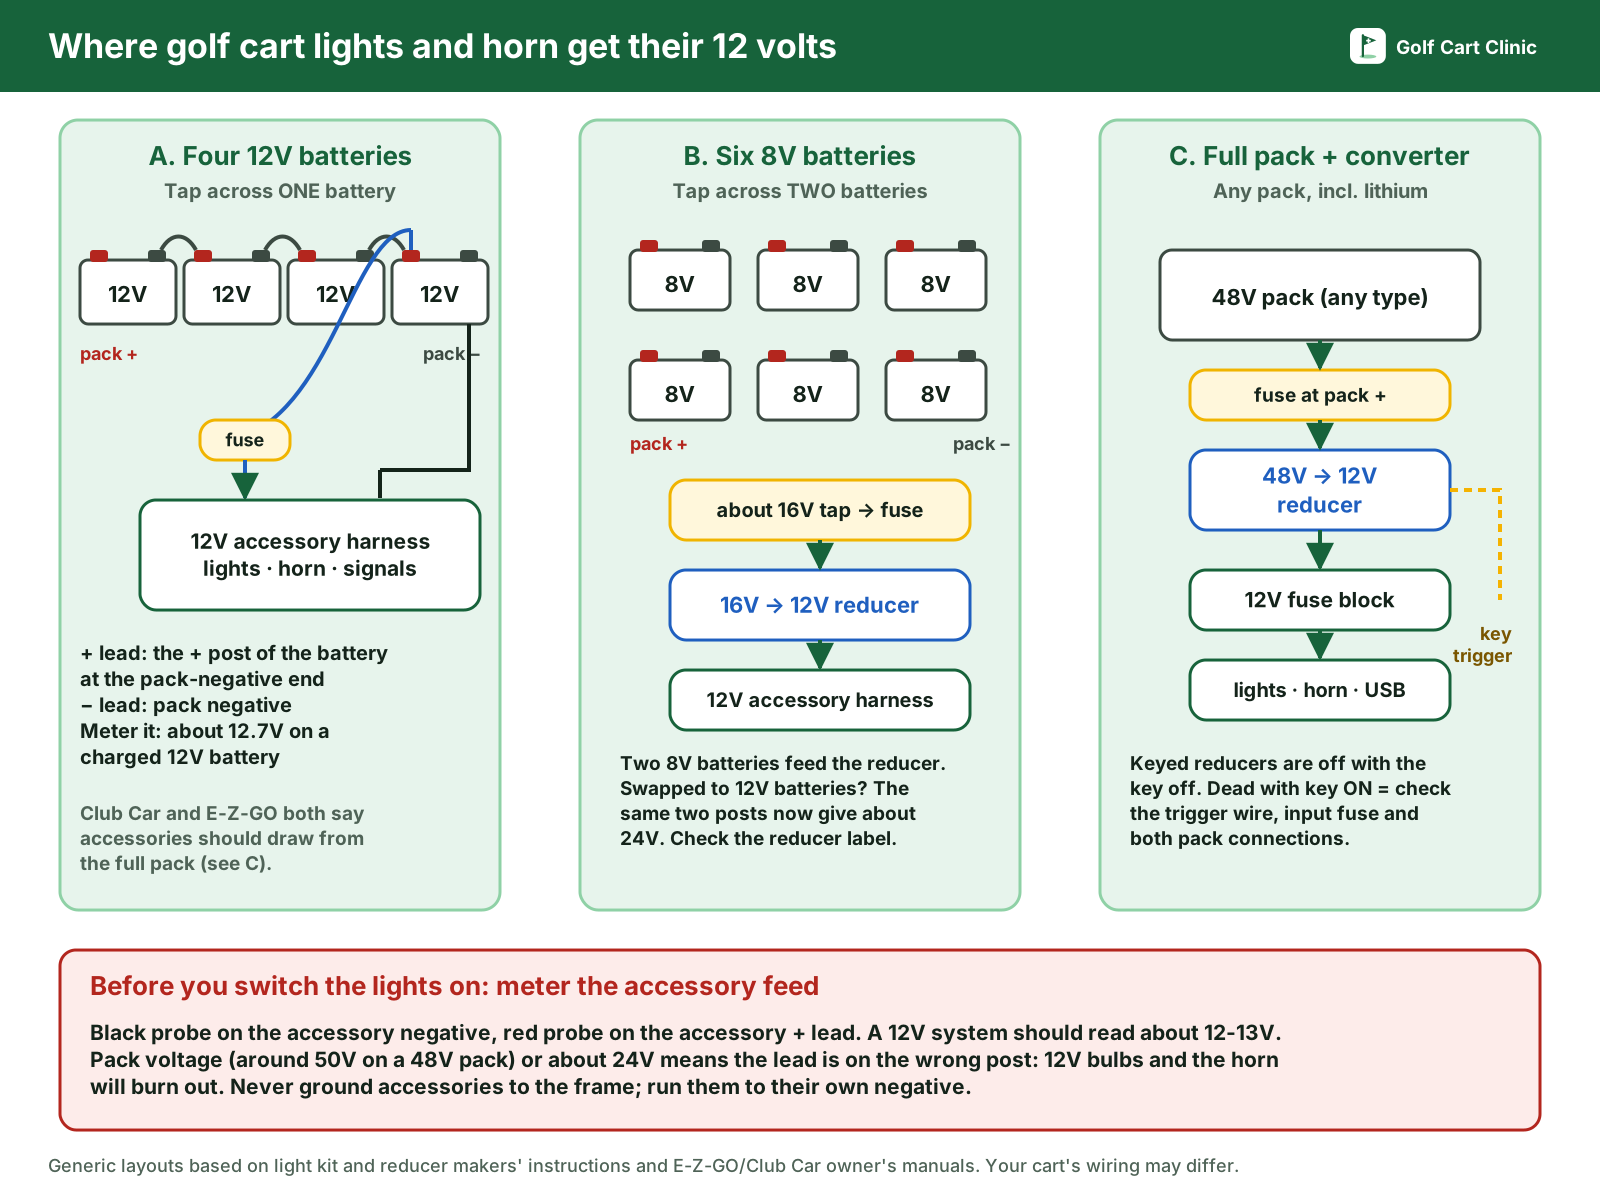
The motor, controller and solenoid run on the full pack through the heavy cables. Lights, horn, turn signals, brake lights and USB ports usually run on 12 volts, and that 12 volts has to come from somewhere. On electric golf carts it comes from one of three places:
- One 12V battery in the pack. Common on 48V carts with four 12V batteries, especially older ones. A small positive lead goes to one battery and the negative goes to the pack negative. Light kit makers' instructions for the Club Car Precedent, for example, connect the kit's fuse harness to a short blue lead on one battery on 2004 to mid-2008 electric cars.
- Two 8V batteries plus a 16V-to-12V reducer. On packs of six 8V batteries, two batteries give about 16V, and a small reducer drops that to 12V.
- The full pack through a 48V-to-12V reducer (also called a DC-DC converter). This is what the factories recommend. E-Z-GO's TXT Freedom 48V owner's guide says accessories that don't use the factory accessory harness must draw from the entire 48V pack, through a DC-DC converter if they need a different voltage.
In all three cases the accessory leads are small wires with ring or spade terminals sitting next to the main cables. When the batteries come out, those leads get pushed aside, tucked under a hold-down, or put back on the wrong post. Shops miss them too.
Match your symptom
| What you see after the new batteries | Most likely cause | Where to look |
|---|---|---|
| No lights, horn, turn signals, brake lights or backup alarm, but the cart drives normally | The accessory + or − lead was never reconnected, or its inline fuse or breaker is open | Small wires near the batteries; the fuse harness on the accessory + lead |
| Accessories work with the key on, nothing with the key off | A key-switched reducer. That's normal | Nothing to fix |
| Accessories dead even with the key on, cart has a reducer | Reducer input lead, input fuse, trigger wire or output not reconnected | Both reducer input leads at the pack, the trigger wire, the 12V output |
| Lights flashed bright and died, or the horn blared and quit, when you switched them on | Accessory + lead landed on a post that's 24V or 48V above the accessory negative | Fix the hookup first, then replace bulbs, flasher or horn |
| Lights dim or flicker, horn weak, worse when driving | Loose or corroded accessory terminal, or the tapped battery is weak | Tighten and clean the tap; load-test that battery |
| Only one item dead (just the horn, just the brake lights) | That circuit's fuse, switch or plug, not the battery swap | Fuse block, switch connector, the item's ground |
| Accessories dead and the cart won't drive | A pack problem: reversed battery, loose jumper or a lithium pack asleep | Our golf cart won't move guide |
Step by step: find and reconnect the accessory feed
You'll need a digital multimeter, wrenches for the battery terminals, a flashlight and 15 to 45 minutes. If you have the photo you took before the old batteries came out, start there.
- Make it safe. Key off, Tow/Maintenance on, charger cord out, parking brake set.
- Look for a loose small wire. Check around and under every battery, under the hold-downs and in the back corners of the battery compartment. You're looking for a lighter-gauge wire (often 12 or 14 gauge) with a ring terminal or a spade, or a short pigtail on a battery post with nothing plugged into it. On Precedents, kit makers describe the accessory positive as a blue lead and the ground as a 12-gauge black wire with a yellow bullet connector behind the batteries. Colors vary by year and kit, so don't rely on them alone.
- Measure the pack and each battery. Black probe on pack negative, red on pack positive: a charged 48V lead-acid pack reads about 50.9V at rest. Then measure each battery. Trojan's chart puts a fully charged 12V battery at 12.73V and an 8V at 8.49V. This tells you which posts give which voltage, and that every new battery is in the string the right way.
- Trace the accessory leads. Follow the wire from the loose terminal toward the dash or the electronics area. If it runs to a fuse holder, a light switch harness or a reducer, you've found the feed. If it runs to the OBC, controller or charger receptacle, it's not an accessory wire; leave it for the cart's own wiring diagram.
- Meter the post before connecting. With the accessory negative in place, put the black probe on it and touch the red probe to the post you plan to use for the accessory positive. You want about 12.7V on a 12V battery tap, about 17V on a two-battery 8V tap that feeds a 16V-to-12V reducer, or full pack voltage only for the input of a 48V-to-12V reducer. If the post reads 24V or 50V and the lead goes straight to the lights, it's the wrong post.
- Check the fuse or breaker. Pull the inline fuse and measure across it on ohms: near 0 ohms is good, OL is blown. Many breakers reset with a button. Replace a blown fuse with the same rating, and don't install a bigger one. A fuse that blew when the batteries went back in usually means a lead touched the wrong post or the frame on the way.
- Reconnect and tighten. Put the accessory ring terminal on top of the main cable lug, not underneath it, so the big cable keeps full contact with the post. Torque to your battery maker's spec; Club Car's Precedent owner's manual gives 110 in·lb (12.4 N·m) for the electric car's battery terminals.
- Test. Tow/Run back to Run, key on, then try the lights, horn, signals and brake lights one at a time.
If your cart has a voltage reducer
A reducer has two input wires (48V positive and negative), two output wires (12V positive and negative), and on many units a fifth trigger wire that switches it on with the key. DoubleTake's VOLT-2003 and VOLT-2005 reducers, for example, are rated 36 to 48V in, 12V out, 30 A and 20 A, and are key-switch activated with thermal overload protection. If the accessories are dead with the key on:
- Input positive must be back on pack positive (or wherever the reducer maker says), through its fuse. Check that fuse.
- Input negative must be back on pack negative. On Precedents, light kit makers use the black wire with the yellow bullet connector behind the batteries as the ground for converters and light harnesses. If your old reducer was wired that way, put it back the same way.
- Trigger wire: with the key on, measure it to pack negative. No voltage means the key-switch connection came loose or it was never a keyed setup.
- Output: measure the 12V output with the key on and compare it with the output voltage on the reducer's label. Correct input voltage, trigger voltage and no output usually means a dead reducer.
DoubleTake also notes that a big spark when you first connect a reducer's power leads is normal. That's its input capacitors charging. A spark that keeps going isn't; stop and read golf cart sparks when connecting the battery.
Did the new batteries change the voltage?
This is the one that burns out lights. If the new pack isn't the same layout as the old one, the old accessory hookup may now land on a different voltage:
- Six 8V batteries swapped for four 12V. The two-battery tap that used to give about 16V for a 16V-to-12V reducer now spans two 12V batteries, about 25V. Check the input range printed on the reducer before you reconnect it. Most carts are better off with a 48V-to-12V reducer on the full pack at this point.
- Four 12V batteries swapped for six 8V. A single-battery tap now gives about 8.5V. The lights will be dim and the horn weak. Kit makers say an 8V Precedent needs a reducer for the lights.
- Lead-acid swapped for one 48V lithium battery. There's nothing left to tap. HPEVS's lithium pack instructions for the stock Precedent say carts with 12V accessories need a DC-DC converter. Some lithium batteries have their own reducer output or contactor; use it if yours does.
Why tapping one battery isn't the best fix
Reconnecting the old single-battery lead will get your lights back, and plenty of carts are wired that way. But the factories don't like it. Club Car's 2015 Precedent warranty excludes damage from "connecting any accessories to less than the full pack of batteries", and E-Z-GO's owner's guide says accessories off the factory harness must draw from the whole 48V pack. The tapped battery does all the accessory work, so it gets drained more than the others and the pack drifts out of balance; the charger only sees the whole pack. If you run lights a lot, a 48V-to-12V reducer on the full pack with a fused 12V block is the better setup.
Two more rules from the manufacturers while you're in there: E-Z-GO says to ground every accessory directly to the battery negative post and never to the chassis, and Club Car says to turn off all accessories before charging.
Only some accessories are dead
If the lights work but the horn doesn't, or only the brake lights are out, the feed is fine. Check that circuit on its own:
- Fuse block. On an E-Z-GO TXT Freedom, the fuse block is under the seat on the driver's side fender liner. Aftermarket light kits often have their own fuse block or inline fuses near the dash or the reducer.
- Connectors you bumped. Seat-area and dash plugs get knocked loose during a battery job. Look for half-seated plugs on the switch and the light kit harness.
- Brake light switch. DoubleTake rates its LGT-138 brake pedal pad switch for 12V DC at 0.5 A maximum, and says incandescent taillights need a relay with it. A switch that was overloaded may have quit.
- Grounds. One accessory with a broken ground does nothing even with 12V at its positive wire. Measure from its positive to its negative wire, not to the frame.
When to call a tech
Call a golf cart shop if any wire or connector looks melted, if a fuse blows again the moment you reconnect, if you can't find any accessory lead at all, or if the cart also won't drive and the pack tests fine. If the shop that installed the batteries left the lead off, ask them to come back and do it; it's a five-minute job for them. Bring the year and model; our serial number lookup helps identify Club Car and Yamaha model years.
More battery help: how to water golf cart batteries (new flooded batteries need it after the first charges), and all our battery and charging guides. Other symptom guides are on the troubleshooting hub.
Frequently asked questions
Where is the accessory fuse on a Club Car Precedent?
It depends on how the lights were added. Light kit makers' instructions for 2004 to mid-2008 electric Precedents put an inline fuse harness between a battery lead and a 12-gauge blue wire under the controller and onboard computer cover, between the batteries. Carts with a reducer usually have a fuse on the reducer input near the battery and a 12V fuse block after it. Trace the accessory positive wire from the battery and you'll find it.
Why did my golf cart lights stop working after I replaced the batteries?
Usually because the small accessory lead that fed the lights wasn't reconnected. On many 48V carts the 12V accessories run off one battery, two batteries through a reducer, or a 48V-to-12V reducer, and those leads come off with the old batteries. A blown inline fuse is the next most common cause.
Which battery do golf cart lights connect to?
On carts that tap a single battery, it's the battery that gives about 12.7V between its positive post and the accessory negative, usually at the pack-negative end. Don't go by battery numbers from another cart's diagram, because numbering differs between instructions. Measure it. A 48V-to-12V reducer on the full pack is the setup Club Car and E-Z-GO prefer.
My lights flashed and burned out when I turned them on. What happened?
The accessory positive was connected to a point 24V or 48V above the accessory negative. Light kit makers warn that connecting to the wrong lead puts 48V into 12V lights and damages them. Move the lead to the correct post or reducer output, meter it, then replace the bulbs, flasher or horn that died.
Do I need a voltage reducer after switching to a lithium battery?
Yes, for 12V accessories, unless your battery has its own 12V output. A single 48V lithium battery has no 12V point to tap. Use a 48V-to-12V reducer sized for your accessories and fused at the pack.
Why do my lights only work with the key on?
Your cart most likely has a key-switched reducer, which turns its 12V output on and off with the key. That's normal, and it means nothing is drawing on the reducer while the cart is parked with the key off.
Sources
- E-Z-GO, TXT Freedom 48V owner's guide (accessories must draw from the full 48V pack via a DC-DC converter; fuse block location; ground accessories to the battery negative post): ezgo.txtsv.com (PDF)
- Club Car, Precedent owner's manual, MY2015 (battery terminal torque 110 in·lb; turn off accessories before charging; warranty exclusion for accessories on less than the full pack): PDF hosted by CartPros
- DoubleTake, LGT-306 light bar bumper kit instructions, Club Car Precedent 2004+ (power connections by year and battery layout, 48V warning, LGT-138 brake switch rating): PDF hosted by Golf Cart Tire Supply
- DoubleTake, LGT-396 bucket harness instructions, Precedent 2008+ (ground wire with yellow bullet, 48V warning, reducer for 8V packs): golfcart.com (PDF)
- DoubleTake, VOLT-2002/2003/2004/2005 voltage reducer instructions (36-48V input, 12V output, 20/30 A, key-switch activation, first-connection spark): golfcart.com (PDF)
- GTW (Madjax) 02-074 Precedent light kit instructions (12V battery connection via fuse assembly; 8V packs need a converter or 16V-to-12V reducer; 48V lead warning): PDF hosted by Nivel Parts
- HPEVS, lithium battery pack installation for the stock Club Car Precedent (DC-DC converter needed for 12V accessories): hpevs.com (PDF)
- Trojan Battery, open-circuit voltage chart: trojanbattery.com
- Your cart's owner's and service manual, your light kit's and reducer's instructions. They take priority where they differ from this guide.
Last checked against the documents above on October 25, 2026.
Questions and comments
No comments yet. Corrections and notes from your own repair are welcome.