
Golf Cart Sparks When Connecting the Battery? How to Find the Short
A single snap when you land the last cable is the controller charging. Continuous sparks mean a real short, usually new accessory wiring. Here is how to find it circuit by circuit on a 48V lead-acid or lithium cart.
Quick answer: one short snap when you land the last battery cable is normal. That's the motor controller's capacitors (and your reducer's) charging up. Sparks that keep going, a hiss, or a cable that gets warm mean current has a real path from one side of the pack to the other, and on carts that just got new accessories it's almost always the new wiring: a meter or reducer lead on the wrong post, or a 48V-side wire that touches the frame. Disconnect, then reconnect one circuit at a time through fuses rated for 48V DC until you find it.
Safety first. A 48V pack, lead-acid or lithium, can push hundreds of amps into a short. That's enough to melt a wrench, weld a ring to a terminal or start a fire. Take off rings and watches, wear safety glasses, use insulated tools and never set a tool on top of the battery. Put the cart in Tow/Maintenance with the key off and the charger unplugged before you touch the pack. If a cable or terminal has melted, the battery case is swollen or hot, or you smell burning plastic, stop and call a qualified tech or the battery maker. Don't try to "test" a short by touching cables together.
Normal snap or a real short?
Knowing which one you have saves a lot of guessing.
| What you see | What it usually means | What to do |
|---|---|---|
| One quick snap or pop the instant the last cable touches, then nothing | Controller or reducer input capacitors charging | Normal. Tighten the terminal and carry on |
| Snap is much bigger than it used to be after you added accessories | New load with input capacitors (a reducer, inverter or second controller) | Usually fine; check the battery maker's install order (see the lithium section) |
| Sparks that keep going for as long as the cable is near the post | A real current path: short, reversed lead, or a 48V wire tied to the frame | Pull the cable away and leave it off. Follow the steps below |
| Sparks plus a fuse blowing, a wire smoking or getting hot | Short through accessory wiring | Same as above; replace any heat-damaged wire |
| Everything goes dead after the sparks | Lithium BMS shut off on overcurrent, or a main fuse blew | Fix the short first, then reset per the battery manual |
Why there's a snap at all: capacitors and pre-charge resistors
Every motor controller has a bank of large filter capacitors on its battery input. When they're empty and you connect the pack, they pull a big burst of current for a split second. That burst is the snap you see.
Most electric carts soften it with a pre-charge resistor: a small resistor wired across the two large posts of the main solenoid. It lets a trickle of current keep the controller's capacitors topped up, so when the solenoid closes there's no surge and the contacts don't arc. Alltrax, which makes aftermarket controllers, lists 220 to 250 ohm 10 W resistors for 36V carts and a 470 ohm 10 W resistor for 48V carts, and notes that some of its controllers pre-charge through the tow/run circuit instead. Club Car's factory Curtis setups use a 250 ohm resistor. Use the value your controller maker lists, not a universal number. There's a value table and a test procedure in golf cart solenoid diode and resistor.
Here's the part that confuses people: on many carts that resistor is wired across the solenoid, so it's live whenever the pack is connected, even with the key off. That's why you still get a small snap at the battery post with everything switched off. The capacitors are charging through that resistor and through anything else wired straight to the pack.
A 48V-to-12V reducer adds its own input capacitors. If your reducer goes straight to the battery posts and only its output is switched by the key, the input side charges the moment you connect the pack. Eco Battery's lithium manual is direct about this: connect the battery terminals before you connect an inverter or DC-DC converter, because terminal arc damage isn't covered by the warranty.
What none of this explains is a continuous spark. Capacitors fill in a fraction of a second and then stop drawing current. If the arcing doesn't stop, something is conducting.
Floating 48V systems: why the frame matters
On most electric golf carts the 48V pack "floats." Neither battery post is connected to the frame, and the drive system uses its own negative cables back to the pack. E-Z-GO's TXT 48V owner's guide puts it plainly: ground every electrical accessory directly to the battery negative post, and never use the chassis or body as a ground connection.
A floating pack has a hidden trap. One accidental connection to the frame does nothing you can see. A cart can run for months with, say, an accessory negative bolted to the frame. Then a second wire on the other side of the pack touches the frame too, and the frame becomes a jumper cable between positive and negative.
That's exactly the "each setup worked on its own, but together I got fireworks" situation. Here's how it happens:
- The new meter's negative lead goes to a frame bolt or a dash ground, while something on the positive side (a chafed wire, a mounting screw through a wire) also reaches metal.
- The reducer's 12V negative is bolted to the frame. With a non-isolated reducer, that's the same as bolting the pack negative to the frame, so any positive-side wire that touches metal becomes a dead short.
- The meter's positive lead got spliced into a wire that's really on the negative or 12V side.
- Three or four ring lugs are stacked on one post, and the meter's red lead or the reducer's + input ended up on the negative post.
The fix is the same in every case: find the second path and remove it.
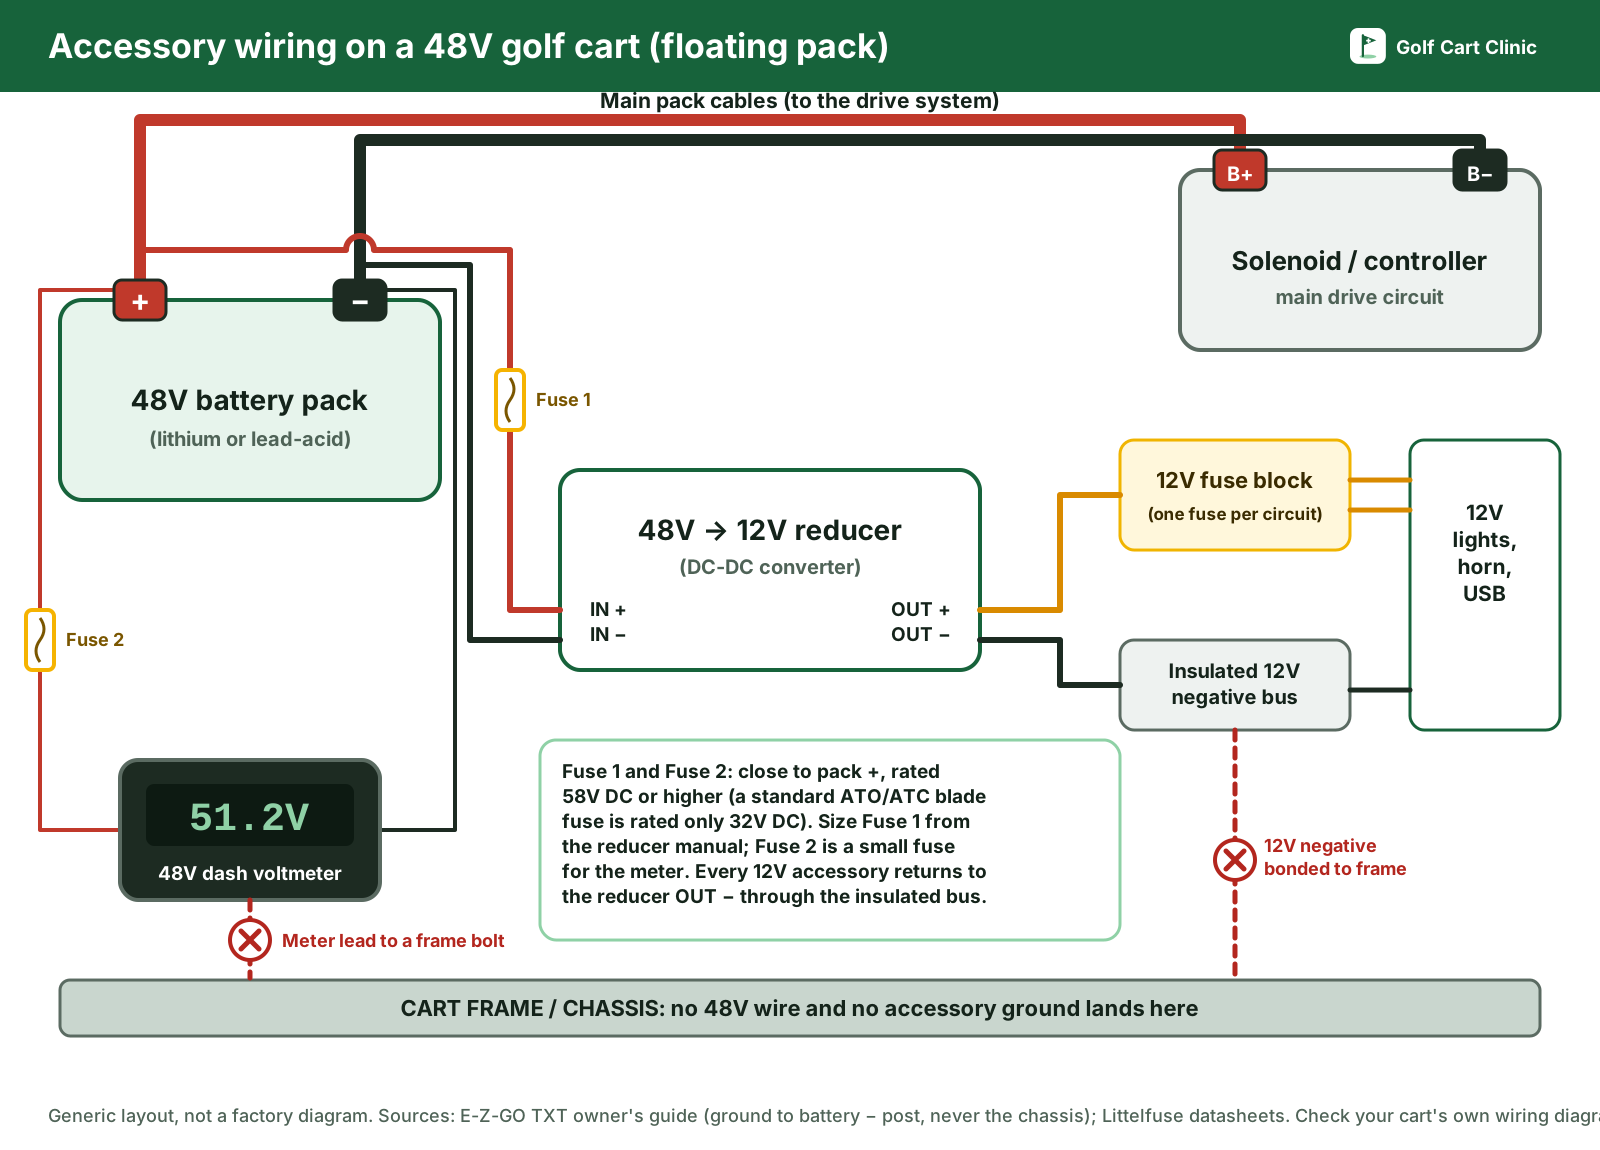
How the 48V-to-12V reducer should be wired
A reducer (DC-DC converter) has four connections, sometimes five:
- Input + (48V): to the pack positive, through a fuse mounted close to the battery. Size it from the reducer manual. Some reducers have no internal input fuse; Victron's isolated Orion-Tr manual, for example, says its 48V models need an external fuse.
- Input − (48V): to the pack negative, or to the controller B− if your cart's manual or the reducer maker says so. Not to the frame.
- Output + (12V): to a 12V fuse block, one fuse per accessory circuit.
- Output − (12V): to an insulated negative bus (or the negative bar on your fuse block). Every 12V accessory's return goes back here, not to the frame.
- Key / enable wire (if fitted): to a key-switched signal so the reducer turns off with the key. Turning the key off doesn't disconnect the reducer's input from the pack, so its input capacitors still charge when you connect the battery.
Isolated or non-isolated: check yours
In an isolated reducer the 12V side is galvanically separated from the 48V side. Victron rates its isolated Orion-Tr units at 200 V DC isolation between input, output and case. In a non-isolated reducer the input negative and output negative are the same conductor inside the box. Plenty of golf cart reducers are non-isolated, and the label doesn't always say. With one of those, anything you do with the 12V negative, you're also doing with the pack negative.
To find out which you have, disconnect the reducer completely and measure resistance between input − and output −. Near 0 ohms means non-isolated. An open reading (OL) points to an isolated unit, but the label or manual is the final word. With a non-isolated reducer, keeping the 12V negative off the frame isn't optional.
Some lithium packs have a dedicated reducer output. HPEVS lithium batteries, for example, include a contactor for the reducer's 48V input so the reducer can't slowly drain the pack, and HPEVS says not using it can affect the warranty. If your battery has one, use it.
How a 48V dash voltmeter should be wired
Make sure the meter is rated for your pack's full voltage range. A charged 48V lithium pack sits above 48V, and a 48V lead-acid pack reads around 51V when full. Then:
- Run the meter's positive lead to the pack's main positive post through a small inline fuse rated for 48V DC or higher, mounted near the battery. The meter draws very little current, so the fuse only has to protect the thin wire.
- Run the negative lead to the pack's main negative post. Not a frame bolt, not the dash's 12V ground, and not the reducer's 12V negative.
- If the meter has a metal case or bracket, check with an ohmmeter that neither lead is connected to the case before you mount it in a metal dash.
- Route the wires away from screws, seat hinges and sharp edges, and use grommets where they pass through metal.
If the meter also needs a 12V supply for a backlight or a switch, follow its instructions for which negative to use.
Step by step: isolate the short and reconnect safely
You'll need a digital multimeter, insulated wrenches, safety glasses, and the right fuses (see the next section). Allow 30 to 90 minutes.
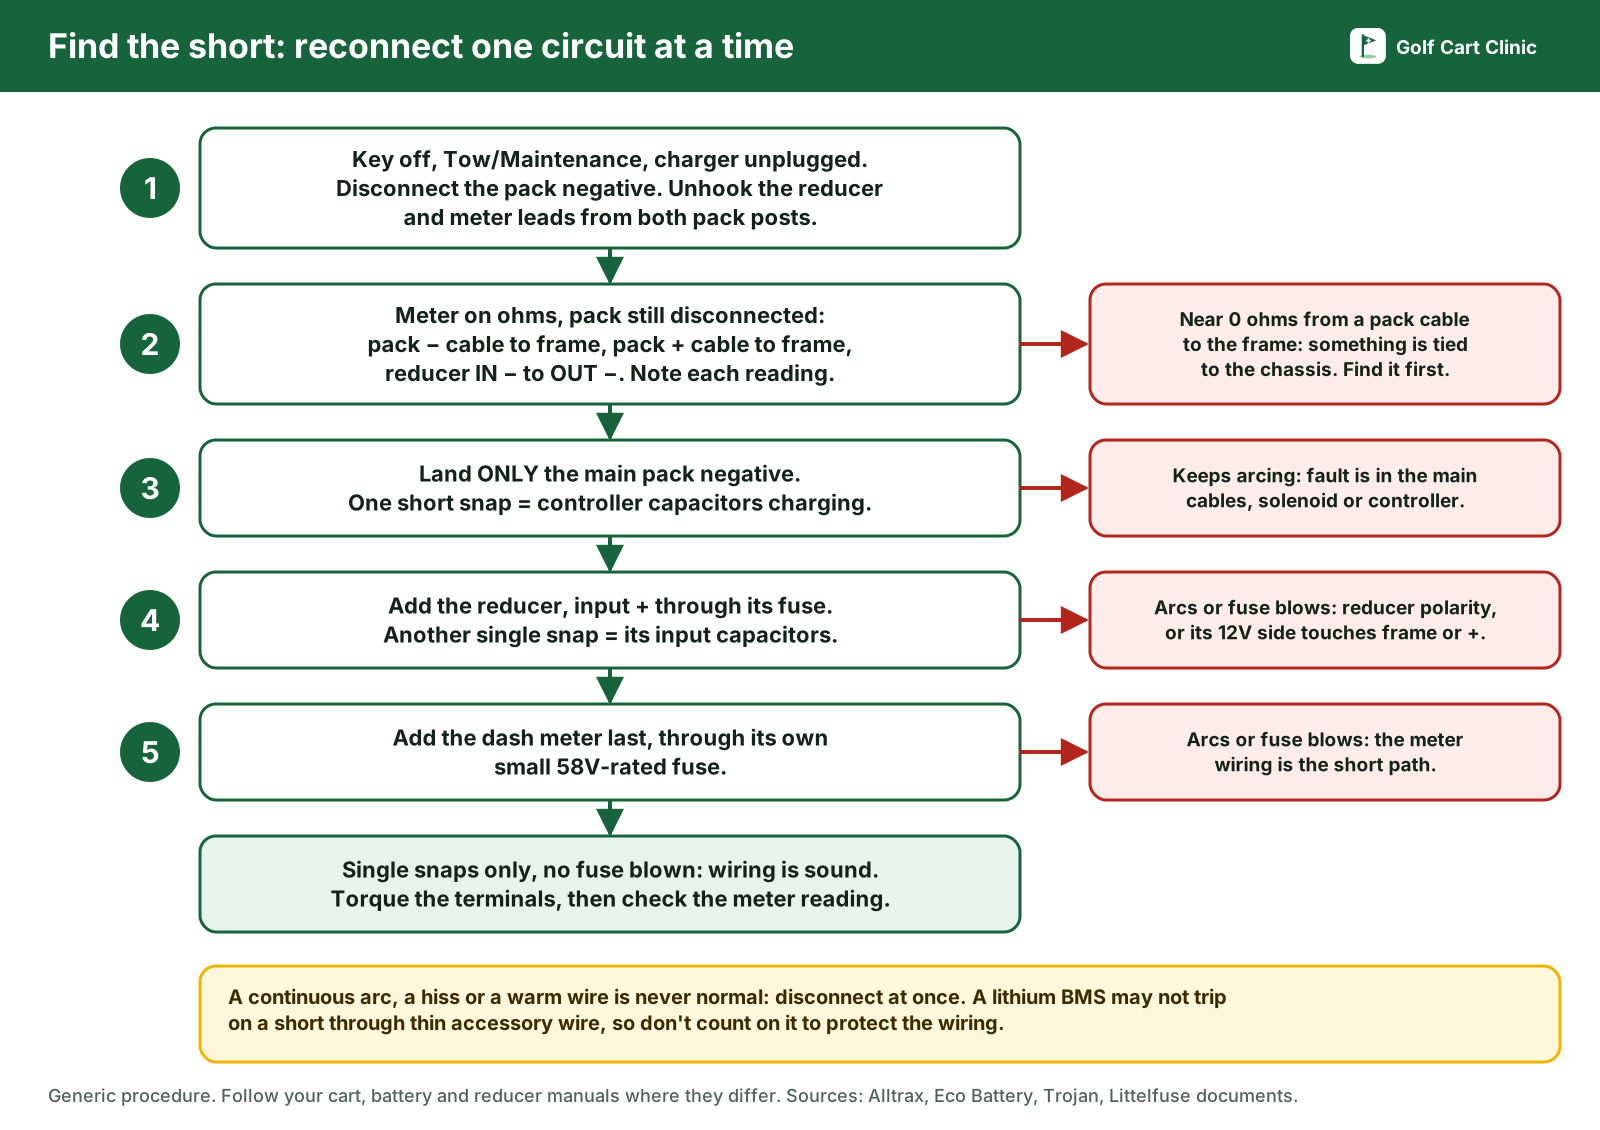
- Make it safe. Key off, Tow/Maintenance on, charger unplugged, parking brake set. Disconnect the pack's main negative cable and move it well away from the post. On a lithium battery with a power button or switch, turn it off too.
- Unhook every accessory lead from both pack posts: reducer input +/− and meter +/−. Tape the ends. You'll put them back one at a time.
- Do the resistance checks in the next section, with the pack still disconnected. They often find the problem before anything gets reconnected.
- Connect only the main pack negative. With just the main cables on, you should get the same small snap you've always had, or none. If it arcs continuously with nothing else connected, the fault isn't in your new wiring. Check the main cables, the solenoid and the controller before going further.
- Add the reducer. Disconnect the main negative again. Connect the reducer's input − first, then its input + through its fuse. Reconnect the main negative. One more small snap from the reducer's input capacitors is normal. Continuous arcing or a blown fuse points to reversed reducer polarity, or its 12V side touching the frame or a positive wire.
- Add the meter last. Disconnect the main negative again, then connect the meter's leads, positive through its fuse. Reconnect. If the fuse blows or it arcs now, the meter wiring is your short path. Trace both meter leads end to end.
- Finish up. Torque each terminal to your battery maker's spec, check the meter reading against your multimeter, and turn the key on to confirm the 12V accessories work.
Fusing every accessory lead before you connect it is what makes this safe. If you've got a short, the fuse blows and that tells you which circuit it's in. Without fuses, the thin accessory wire is the weakest point, and it melts.
Multimeter checks that find the short
With the pack disconnected (resistance / continuity)
- Pack negative cable to frame. One lead on the loose main negative cable end, the other on clean bare metal on the frame. On a floating system you want an open reading (OL). A reading near 0 ohms means something on the negative side is tied to the chassis.
- Pack positive cable to frame. Same test on the positive side. Near 0 ohms here is the dangerous one: connect the negative and the frame carries the short.
- Accessory leads to frame. Check each loose reducer and meter lead to the frame. Anything near 0 ohms is touching the chassis somewhere along its run.
- Reducer input − to output −. Tells you whether it's isolated (see above).
- Meter leads to meter case, if it's metal.
Readings in the thousands of ohms or higher can show up because the controller and other electronics are still connected. A dead short reads close to 0 ohms. If you're unsure, unplug the suspect circuit and test again.
With the pack connected (DC volts)
- Across the pack: black on main negative, red on main positive. This is your baseline. Check that your new dash meter agrees with it.
- Pack positive to frame, then pack negative to frame: on a floating pack these readings are usually low or drift around, because there's no solid connection. A steady reading close to full pack voltage from positive to frame means the negative side is tied to the frame somewhere. Steady full pack voltage from negative to frame means the positive side is.
- Reducer output: 12V output + to 12V output −, key on. Compare it with the output voltage on the reducer's label.
Fuses: why car blade fuses aren't enough at 48V
The fuse holder most people grab is an ATO/ATC-style car blade fuse. Littelfuse rates its ATOF blade fuses at 32 V DC, with a 1,000 A interrupting rating at 32 V DC. Its fuseology guide says a fuse's voltage rating must equal or exceed the circuit voltage, and above it the fuse can be damaged when it tries to clear a fault. A 48V pack is well above 32V, so a 32V fuse on the 48V side may not clear a fault safely.
Use fuses rated for 58V DC or higher. Littelfuse makes MINI blade fuses rated 58 V DC in 2 to 30 A, and MAXI 58V fuses in 20 to 80 A, both with a 1,000 A interrupting rating at 58 V DC. Littelfuse designs them so a lower-voltage fuse can't be swapped in by mistake. Check the DC voltage rating before you buy an inline holder kit; if the kit doesn't list one, don't use it on the 48V side.
Put the fuse close to the battery post so it protects the whole length of wire, and size it to the wire and the device maker's instructions.
Lithium battery and BMS notes
- The BMS isn't a fuse for your accessory wiring. A lithium battery's BMS shuts the pack off on a short, but only above its trip point. Trojan's GC2 48V lithium battery, for example, shuts off at 660 A instantaneous short-circuit current. A short through thin meter wire can carry far less than that and still melt the wire, so it may never trip the BMS. That's why every accessory lead needs its own fuse.
- If the pack went dead after the sparks, the BMS has probably shut off to protect itself. Fix the short first, then reset it the way your manual says. Trojan's short-circuit shutdown doesn't restart on its own; you push and hold the battery's status button to clear it. Eco Battery's troubleshooting chart says to disconnect the battery terminals for one minute and reconnect, and to contact Eco Battery if that doesn't work, because a short can damage the BMS.
- Connection order. Follow your battery maker's order for main cables and accessories. Eco Battery says to connect the battery terminals before connecting a DC-DC converter.
- Use the battery's own accessory or reducer output if it has one (some packs, like HPEVS, provide a reducer contactor).
- Never tap part of a pack. On a single 48V lithium battery there's nothing to tap anyway. On a lead-acid pack, running 12V accessories off one battery unbalances the pack. Use a reducer. If your accessories went dead after a battery swap, here's how to find and reconnect the 12V feed.
Check the terminal and lugs for damage
After a few seconds of arcing, look closely at the negative post and every ring lug that was on it:
- Pitting, melted spots or black scorch marks on the post or lug reduce the contact area, so the joint heats up under load. Replace damaged lugs. If a battery terminal itself is melted or deformed, contact the battery maker before using it.
- Heat damage on the insulation (shiny, bubbled or stiff) of any accessory wire means that wire carried the short. Replace it.
- Stacking order. Trojan's lithium guide says the cable lug must sit directly on the terminal with any washer on top of the lug. A washer between the terminal and the lug creates high resistance and heat. Put the main cable lug at the bottom of the stack.
- Torque. Use your battery's specification. Trojan's GC2 48V lithium battery has M8 studs torqued to 80 to 90 in-lb (9 to 10 N·m). Loose terminals can melt and over-tightened ones can break.
If you have flooded lead-acid batteries, look for corrosion and low electrolyte while the cover is off. Our guide on how to water golf cart batteries covers that. Our battery and charging guides cover pack care in general.
Still sparking with no accessories connected?
If the arc happens with only the main cables connected, the new wiring isn't the problem. Common causes are a welded or shorted solenoid, a failed controller, a damaged main cable rubbing on the frame, or reversed main cables after a battery swap. That's drive-system troubleshooting. Our solenoid clicking but won't move guide shows how to test the solenoid posts with a meter, and the troubleshooting hub lists every symptom guide. To find your cart's year and model for the right wiring diagram, try the serial number lookup.
Frequently asked questions
Is it normal for a golf cart battery to spark when connecting it?
One small, quick spark when the last cable touches is normal. It's the controller's capacitors (and any reducer's) charging. Sparks that continue, a hiss, or a cable that gets hot are not normal and mean there's a short or a wiring mistake.
Why does my cart spark with the key off and in Tow mode?
The key and Tow switch don't disconnect everything. On many carts the pre-charge resistor across the solenoid, and any reducer wired straight to the pack, are live whenever the battery is connected. A small snap with the key off is expected; continuous sparking still means a fault.
Can I ground 12V accessories to the golf cart frame?
On a floating 48V system, no. E-Z-GO's owner's guide says to ground accessories directly to the battery negative post and never to the chassis. Run all 12V returns to the reducer's 12V negative through an insulated bus. With a non-isolated reducer, a frame ground also ties the pack negative to the frame.
What fuse should I use on a 48V golf cart accessory wire?
A fuse whose voltage rating is at least your circuit voltage, such as a 58V DC-rated blade fuse, sized for the wire and the device. Standard ATO/ATC car blade fuses are rated 32V DC, which is below a 48V pack's voltage.
My lithium battery died after it sparked. Is it ruined?
Often the BMS has just shut off to protect the cells. Fix the short first, then follow your battery's reset procedure: some need a button held, others need the terminals disconnected for a minute. If it won't come back, contact the battery maker, because a short can damage the BMS. If the battery is back but the cart still won't drive, work through our golf cart won't move checklist.
Sources
- Alltrax, EV systems components (pre-charge resistor purpose and values by voltage): alltraxinc.com
- Alltrax, AXE operator's manual, section 3.2 "Pre-charge Resistor": alltraxinc.com (PDF)
- Revolution Golf Cars, OEM Club Car 48V pre-charge resistor 1014947 (250 ohm, factory Curtis controllers): revolutiongolfcars.com
- E-Z-GO, TXT Freedom 48V owner's guide (ground accessories to the battery negative post, never the chassis): ezgo.txtsv.com (PDF)
- Trojan Battery, GC2 48V lithium user's guide (terminal torque, washer placement, BMS protection limits): trojanbattery.com (PDF)
- Eco Battery, lithium owner's manual (connect terminals before a DC-DC converter; BMS protect mode): PDF hosted by Active Golf Carts
- HPEVS, lithium battery DC-DC (voltage reducer) connection instruction: hpevs.com (PDF)
- Victron Energy, Orion-Tr isolated DC-DC converter datasheet (200 V DC galvanic isolation) and manual (48V models need an external input fuse): datasheet, manual
- Littelfuse, ATOF blade fuse datasheet (32 V DC): littelfuse.com; MINI 58V datasheet: littelfuse.com; MAXI 58V series: littelfuse.com; Fuseology (voltage rating rule): littelfuse.com
- Your cart's owner's and service manual, your battery's manual and your reducer's instructions. They take priority where they differ from this guide.
Last checked against the documents above on October 23, 2026.
Questions and comments
No comments yet. Corrections and notes from your own repair are welcome.